Contact Us

saas@sparxsystems.com

This article is for modelers and admins who are starting their EA practice in EA SaaS. The article covers how to exchange EA Model Information from local to cloud machine.

For the novices to EA SaaS,  we have come up with a step-by-step guide on how to perform certain tasks which differ from local machine in EA SaaS. In the table below, we have mentioned the functionality of four icons in EA SaaS environment. 

IconDescription
Click on this Icon to exchange files from a local machine to EA SaaS and vice versa.
Click on this Icon to exchange text between a local machine and the EA SaaS session.
Click on this Icon to extend the displays (Multiscreen), a tab appears at the top-centre edge of the screen. To exit full screen mode, choose the tab
and then Exit full screen.
To extend the display in the client, choose to Enter full screen.

Export a XML file from EA Model

To Export a file from your computer to the session storage follow the below steps: 

1. Select the package you want to export from the repository browser.

2. Click on ‘’Publish from the ribbon, followed by  Click on“Export” dropdown and select “XMI Format from there.

3. Choose the path to a save the file and mention the file name. Select XML in Native Format and click “Export”

4. Repeat the abovementioned steps if you want to export any additional root nodes you want to transfer.

Transfer the XML file from Local Machine

1. Launch the EA SaaS portal, Use the EA SaaS URL and login to the repository with respective credentials.

2. Once users are logged in to the model, they can see the demo model. To work with the exported model. users need to upload the files into the EA SaaS system.  Click on the icon with two vertical arrows at the top left corner of the screen.

3. Click upon “Upload file” and select the respective file that user want to import. Please follow the same steps if you have multiple nodes. User will see the files in the list. 

Or

We can Drag and Drop the file

4. The files are now stored in the ‘Downloads’ folder on the EA SaaS. Now users can import them into the model by selecting the root node where the data needs to be imported  into the model. In this case, pick the “Model” node.

Import the XML file to Model via EA SaaS

1. Go to Publish -> Import Package -> Click Import  -> XMI file option from the dropdown

2. This will prompt import XMI window. from here  choose the file which needs to be imported into the model via Browse button and click  ‘Import’ as shown in the image below.

3. If you are prompted with this screen, click “No”.

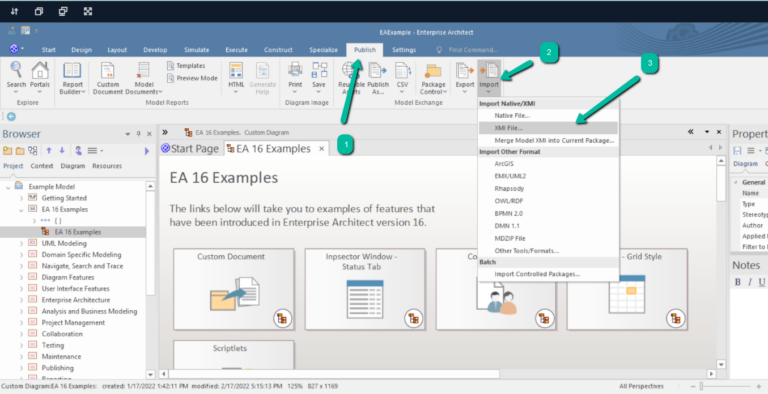
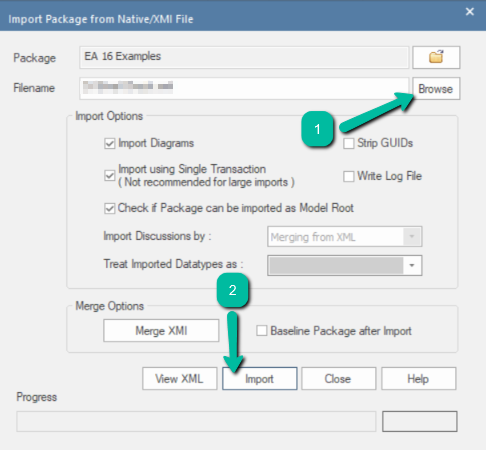
4. The import will run, and user should be able to see the content in the Model root node after the import is completed.  Next, close the ‘Import’ window.

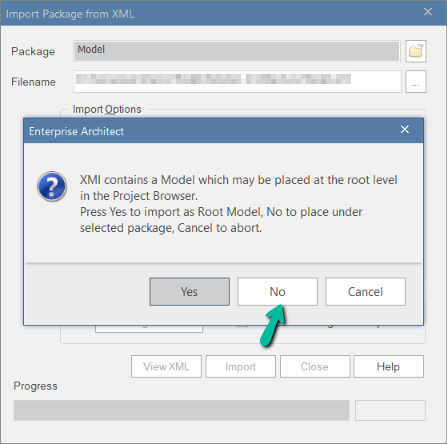
5. Repeat the same steps if you have any additional nodes, being sure to select the model root node before opening the import screen again (or else you’ll end up putting your content down a layer lower than what you want).

Let see how we can Export the XML file from the EA Saas.

Step 1:

Select the “Publish – Export – XML file” as shown in the image below.

From the Export XML window

  1. Select the package you wish to export.
  2. Choose the folder and provide a filename for the XML file where the export will be saved.
  3. Opt for the XML format in its native form.
  4. If necessary, indicate the desired version.
  5. Once these selections are made, click the export button to initiate the exporting process.

When the export is  completd click on the ’Close’ button to exit.

Step 2:

 Clcik on the upload and download icon on the top left as image below

We can find the list of files which is available in our download folder.  Select the XML file that is to be downloaded from here.

Click on the ’Action’ button followed by Download.   This will download the exported xml from ea Saas to the local

You can use the XML that was exported for your local Enterprise Architect by following these steps.